Wednesday 16 December 2015

Express elevator to Hell

So last time I posted I had attempted to give my Valkyries a chipped paint look using salt although the method technically worked the results were less than satisfactory.  I failed to apply it correctly; applying too much salt and in the wrong locations. So in this post I will go over the lengthy descent into hell I experienced  attempting to repair the damage I had done; and the process of completing the painting of the models. My first step was to repaint the Valkyries and cover up all that shiny metal spray paint. I needed a couple of coats of red starting with a darker shade and I had to paint over the whole model to blend the all the colours together  My air brush was a huge help for this, laying down even smooth coats of paint quickly.

My failed attempt at salt chipping.

The Havlock crest on one of my homemade stencils. 


Once I was done I got to thinking about detail. I wanted to use the Havelock family crest as described my my players;  and figured that the wings of the Valkyries would provide perfect spaces for it. Now I just needed to figure out how to get it on there neatly I toyed with the idea of a laser cut stencil for a while several companies could provide me what I wanted easily enough but it would cost a little more than I wanted. So I decided to make my own stencils. I would print out the image onto a piece of paper cut out the area to be painted and just spay through the remaining negative. The only problem is that airbrush paint is very thin and paper doesn't like being wet and how would I prevent the paper from being dislodged by the air blasting out of the airbrush? The solution: I would print out the image onto a sticker cut out the area to be painted and just spay through the remaining negative. Boom, genius, mike drop, (oh how foolish I was). I grabbed some sticky labels of appropriate size printed out my design placed them on the wings of one of my Valkyries then I noticed that one of the labels was a little crooked.  As I removed and re-positioned the offending label the sticky surface of the label lifted the paint strait of the surface of the model but only where I had previously painted it with the horrible metallic silver paint. It appeared that the texture of the spray paint was proving difficult for the acrylic GW paint to bond to. I placed the Valkyrie with the ruined paint scheme to one side; I still had another. I figured the sticky bond of the label was too strong so I had an idea to protect the paint on this Valkyrie with talcum powder. I spread the talcum over the wings then applied the labels with the printed designs they didn't seem to sticky and were able to be re-positioned easily enough. I then lightly cut the design out with a hobby blade. Unfortunately when I removed the cut portion some of the paint again lifted from the wing revealing the silver curse of my own making.

The wings after I remover the first labels.


The wings with a protective layer of talcum powder.


The talcum powder wasn't protective enough. 


After removing the remainder of the labels and putting them away in frustration; I worked on my naval arms men/conscripts greened stuffed their hats, base coated them, and painted a batch to tabletop standard.


Greened stuffed tricorn hats. 


One batch at table top quality, one with two base colors, and one with under coat.

I after my conscript break from the Valkyries I returned. Firstly I washed the models thoroughly to get all trace of the label glue and the talcum of the wings. I once again had to repaint the Valkyries and cover up the evil shiny metal spray paint. I again started with a darker shade and I had to paint over the whole model to blend the all the colours together.  I couldn't have done this without my air brush the thin coats of paint were starting to build up. If I had painted the Valkyries with a brush they would have just been big blobs of paint with a plastic centre by now. I again turned my attention to painting Havelock family crest  on the wings of the Valkyries this time I traced the image on the wings with a pencil and used the outline as a guide to paint the eagle and fist. The result looked better than I expected.


My hand painted design. I am surprised how not crummy it looks.

I then began mucking things up giving the Valkyries a beat up look lots of paint chipping and muck. giving the dropships a really worn look I figure doping from orbit isn't the gentlest of experiencesThis time I used a piece of packing foam from a blister to sponge on the chipping. a trick I learned from a Beasts Of War backstage painting video but the excellent Duncan Rhodes has also done one. Firstly I applied a mixture of dark brown mixed with some black  then some metallic lead bleacher to give the effect of chipped paint with some bare metal showing on the most worn areas. To give the effect that the paint wear was from flight to restricted the wear to the leading edges of the model and each panel. I used some blue painters tape to protect the trailing edges of the wing and tail panels.


Painters tape to protect the trailing edges of the panels.

After I had sponged on the paint chips and metallic paint I removed the painters tape and once again it appeared that the texture of the spray paint was proving difficult for the acrylic GW paint to bond to. As I removed the tape the sticky surface of the tape lifted some of the paint off the surface of the model. This time I had to repaint over he exposed metallic spray paint but I couldn't use the airbrush unless I wanted to cover up all the chipping I had done. So I carefully brushed on some paint, layering up to match the existing red hue, Then I weathered it to look like the remainder of the Valkyrie. The end result wasn't too horrible.


The silver curse strike again.
Can't use the airbrush here.


I actually think I did a good job in the end.


My next project is paint up a Lemun Russ.


But to that second circle of sad hell,
Where ‘mid the gust, the whirlwind, and the flaw
Of rain and hail-stones, lovers need not tell
Their sorrows. Pale were the sweet lips I saw,
Pale were the lips I kiss’d, and fair the form
I floated with, about that melancholy storm.


Tuesday 27 October 2015

Soaring in the heavens, or descending into Hell: A Valkyrie story.

Greetings,
It's be a good long time since I've posted anything I might say it's because I've been too busy with gaming and other hobby stuff. Or I may say I was occupied with university or work, but they would be poor excuses. The truth is is mainly laziness that has prevented me form posting. But I haven't be completely inactive this whole time. I have managed to work on the flyers for my Rogue Trader themed Imperial Guard force. When I got my airbrush I started looking at different ways to paint with it.  One of the coolest tricks I found was salt chipping. So I soon got an idea to have my Valkyries display a high degree of wear and tear the reasoning being a Rogue Trader on a  lengthy voyage wouldn't be stopping off for a resupply regularly. I would spray my flyers with a bright metallic base, salt that sucker up, paint over the whole lot, and then just chip the salt away to reveal the bare metal of the fuselage.  Easy right?
First I set out for some metallic paint for the airbrush. After some research I discovered that normal metallic paint isn't suitable for airbrushing. Apparently the metallic particles in the pigment tends to
gum up the airbrush. There are products that allow metallic airbrushing like the Model Air range of paints from Vallejo.

What could go wrong?
But me being my usual impatient self just decided to use whatever was available locally in this case cheep silver spay-paint.

So first up I had to assemble the pair of Valkyries I had. I avoided using the instructions for most of the construction. But I had to check them for the location of some of the smaller parts. I stuffed up one of the wing weapon hard-points when I glued it in back to front the only thing that tipped me off was that the angle seemed wrong. Another this was I did was leave the pilots torsos out of the original construction I had to trim them a little to make them fit after they were pained. During the assembly I installed a series of 3mm circular magnets. The idea being that later down the track I could swap out the weapons or even convert them them Vendettas.


Assembly complete. 
Magnets on the hard-points.


Magnets behind the multi-laser.
Top off for future painting.


Magnets for the rear door too.
Rear door magnet works good. 


Blue painters tape to protect the primer.
The internals a light grey to reflect light. 


Internals painted.
Internals painted. 


Painted flight controls #2
Painted flight controls #1


More blue painters tape.

Blue-tac to protect the cockpit.


What have I done!


Painted pilots  


Canopy fitted over cockpit.
Canopy fitted over cockpit


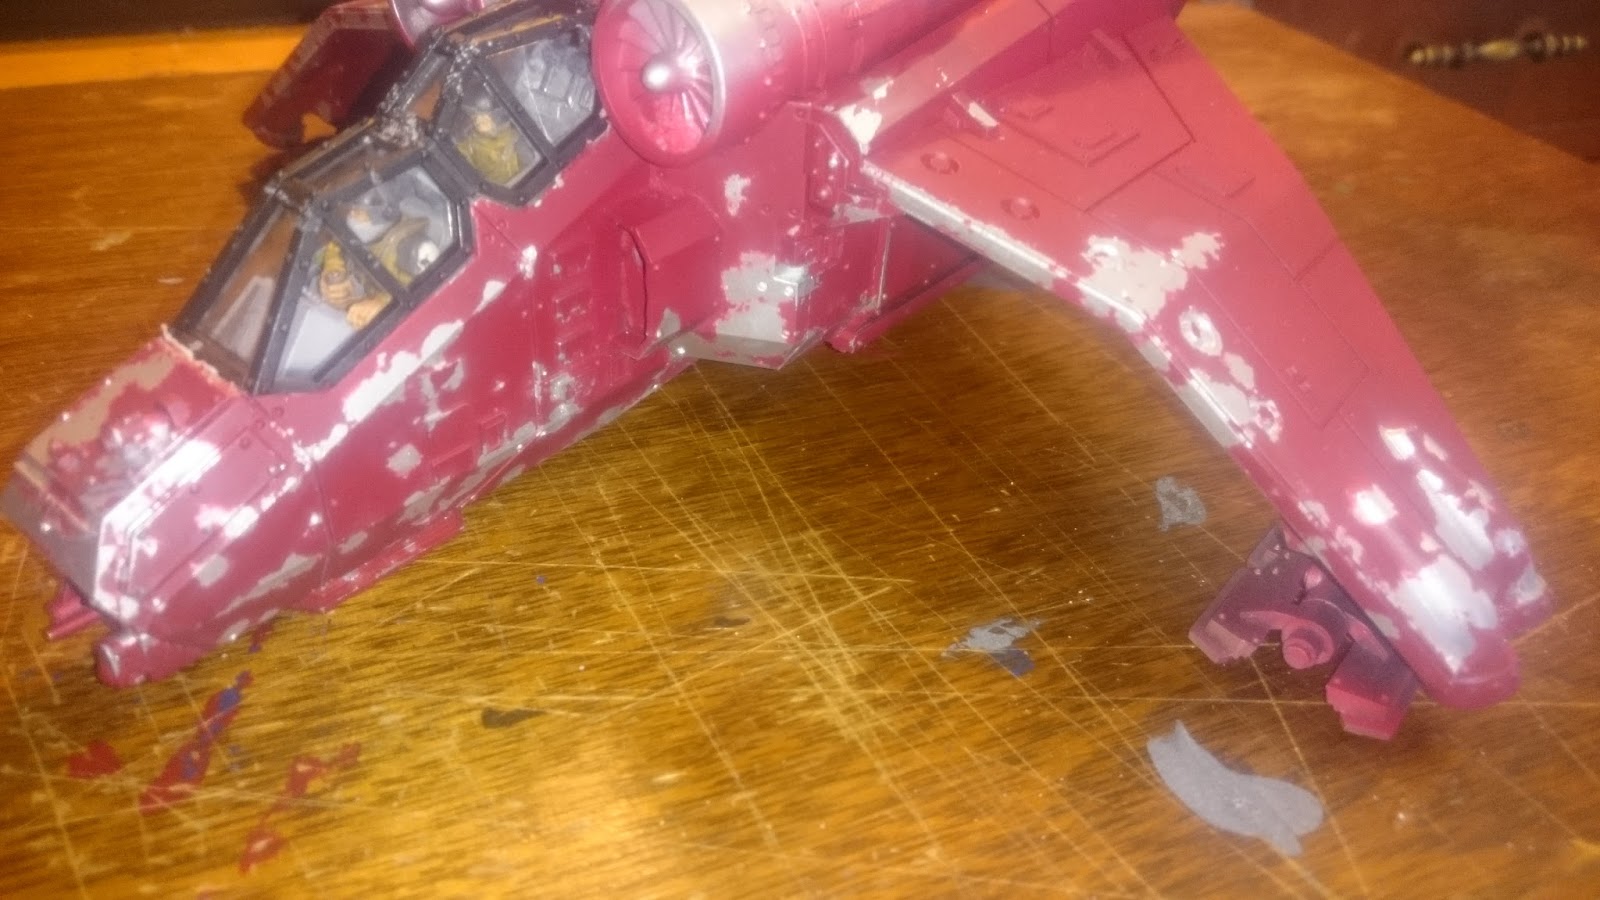
Now it's time to start the salt coverage. I grabbed a small bowl of water, some paper towels, a brush, and and some salt. I laid the towel down to help with the mess then used the brush to paint on some small dabs of water I tried to keep the water to the edges of the model but often the surface tension of the droplets broke it was much easier to dab the water on the flat of a panel. Next I sprinkled salt over where I had added the water when the salt  touched the water it congealed otherwise it just fell off. I repeated this process until I thought I had  covered enough of the model. Then I grabbed my airbrush and begun layering up red paint until I couldn't see the base colors anymore. When I was done and the paint had dried I begun the very messy process of brushing all the slat off I used a small house paint brush it fairly soft bristles and the salt came off easily I ended up with a large red salty mess of dried paint. The effect of the chiping actually looked good; I guess because it was actually chipped paint. But the overall look of the miniature looked off. I think I simply used too much salt and in the wrong places.
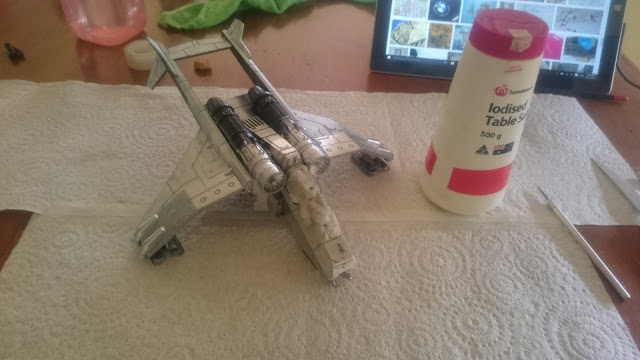

Ready for the salt

Perhaps too much 


I like the effect but not the placement. Too much in the center of the panels, and too much overall. I think less will be more. 


See! warp is stretched
Forwarriors' fall,
Lo! weft in loom
'Tis wet with blood;
Now fight foreboding,
'Neath friends' swift fingers,
Our grey woof waxeth
With war's alarms,
Our warp bloodred,
Our weft corseblue.
"This woof is y-woven
With entrails of men,
This warp is hardweighted
With heads of the slain,
Spears blood-besprinkled
For spindles we use,
Our loom ironbound,
And arrows our reels;
With swords for our shuttles
This war-woof we work;
So weave we, weird sisters,
Our warwinning woof.

Saturday 4 April 2015

Nebulization

Airbrushing the night away

So I recently got hold of an air brush. It was something I've been wanting to get for while. Learning all the ins and outs has been fun. Using it is definitely a skill I want to improve on if not master. A few of the things I have learned so far are.
  • Keep it clean
  • Flush with water after every use
  • Clean the needle and nozzle regularly
  • thin the paint. nope still too thick thin it more
  • Clean and flush it again  
  • Use thin paint, very thin paint
  • If you're going to have a problem its probably a dirty nossle or needle  
Beast of war have an excellent selection of introductory air-brushing videos for their backstages
Since I got this shiny new toy I figured I better use it. My first attempts were just on paper but I soon tried it out on some minis. I was a little over painting my imperial guard so I practily jumped a friends offer to help him with some Shadow of Brimstone miniatures. He backed the kickstarter and now had too many miniatures than he knew what to do with. Further more he isn't a wargamer so he wasn't used to the heaps of multipart plastic miniatures in sprue form, and wasn't relishing the prospect assembling them. I however enjoy all three sides to the hobby triangle. (assembly, painting, and playing) the miniatures were of acceptable quality, but lacking the multitude of fine detail found on GW miniatures that I have become accustomed to. The vent lines in the sprue were a little thick for my liking and made it a little difficuled when removing them from the sprue. Upon assembly I noticed another minor fault with the minis. Although they fitted together well the smother sculpts made for easily identifiably joins. Other companies have learned to hide joins like these under the edge of some detail like armour or cloth. Perhaps the visible joins were a symptom of an emerging company just starting out, poor quality control of a mass manufactured product that was rushed out to fulfil a kickstarter promise, or perhaps a sign of an uncompromising design direction; to create smother organic looking miniatures on a budget.  You'd think Liquid GreenStuff from GW would be the perfect thing to fix this problem, but you'd be wrong.

 
Harbinger I filled the gaps with liquid green stuff twice.
Yep looks good. Smoothed out those join lines


Goliath I filled the joins four times. The gaps were much more pronounced.


I think they still need work, but I just got sick of green stuffing and waiting for it to dry. 


First time air brushing. First I coated the mini in red then I browned the bony structure of the wings. The blue tack is to protect from over spray.


Next step is a flesh tone on the wings. The air brush laid down a very smooth layer of paint.


Green and flesh base colours.
Highlights, glaze, and gloss varnish to make it look wet and slimy  


I think it worked


Air brush and dry brushing. I used blue tack to protect the different shades of green from over spray.


Terraforming  

For the longest time I've wanted a Gaming table. But I've also wanted the opportunity to play on a variety of terrain, and I don't have the space to store a 4' by 6' table. The solution I figured was a modular table with modular terrain. Several companies have offered different types of tile. Even GW but I was never happy with tether the cost or the size, So begun a slow burning idea for 1' by 1' custom terrain tiles. I figured  I could create a variety of tiles all the same thickness and size. And as my collection grew I could mix the different stiles together. I could have battle scared cityscape slowly transfer into a cratered muddy no-mans land then finally into a trench network; then change it up the next time I played.  The best bit would be that the tiles would be thick enough so that the craters and trenches were actually in the ground rather than the typical wargaming terrain sitting on top.  I started out drawing the designs on top of 5mm tick foam-core then I would stick that on top of insulation foam sheets. For years I've been looking for a local supplier of insulation foam. This wonders material than every hobby blog said to use and would be available in any hardware store. Perhaps North Australia isn't in need of as much insulation as North America or Europe because I could never find the stuff. Then one day when I was looking to order some from the cooler states down south I found a stock listing for a local hardware store "pink foam; perfect for insulation and hobby needs" so I decided to make up some test pieces to see if my idea was sound. I decided on a urban road theme for my test.          

I sandwiched two layers of foam core together drew on the design and scored the lines for the concrete joins.  Then painted the scores black to hide the white foam core and provide shading.


I used textured paint for the concrete
I had to make up some textured paint for the asphalt


Sand box sand and black craft paint. Yum.
A stepped creator or collapsed road


Each step is wide enough for a mini
Each sheet is 30mm perfect for a GW mini


Air brush to stencil on the white lines
I think my concept is sound


    The next step is to see if my local hobby club is interested in using this system for their tables. If so then I can utilized their expertise to create better tiles before producing a full set for myself.